
This is Part 4 and final part in Sitecore 9 - Multi Server Installation series and in this blog I will go through steps how to setup a dedicated Web server.
Sitecore 9 introduces xConnect, which is the service layer that sits in between xDB and any trusted client, device, or interface that wants to read, write, or search xDB data.
Communication must happen over HTTPS and clients must have appropriate certificate thumbprint.
We are installing both Sitecore and xConnect on the same web server. Follow the steps below.
Steps
- Prerequisites for using Sitecore Installation Framework
Make sure all of the following is installed on the web server:- Microsoft PowerShell v5.1 or later
- Web Platform 5.0 (install following through WP5.0)
- Web Deploy 3.6 for Hosting Servers
- URL Rewrite 2.1
- Microsoft SQL Server Data-Tier Application Framework (June 30 2016)
Download and install DacFx from https://www.microsoft.com/en-us/download/details.aspx?id=53013 - Download and install SQLSysCLRTypes.msi from https://www.microsoft.com/en-us/download/details.aspx?id=52676
- If you are running an x64 environment you must install both the x64 and x86 versions of DacFx and SQLSysCLRTypes
- Download and install Microsoft Visual C++ 2015 Redistributable Update 3 from https://www.microsoft.com/en-us/download/details.aspx?id=53587
- Microsoft ODBC Driver 13 for SQL Server https://www.microsoft.com/en-us/download/details.aspx?id=50420&ranMID=24542&ranEAID=TnL5HPStwNw&ranSiteID=TnL5HPStwNw-uAPrkuV2kr6Gbe6cs6aZtw&tduid=(201a613082386a51bef87b0d91ea32cb)(256380)(2459594)(TnL5HPStwNw-uAPrkuV2kr6Gbe6cs6aZtw)()
- Microsoft Command Line Utilities 13 for SQL Server https://www.microsoft.com/en-us/download/details.aspx?id=52680&ranMID=24542&ranEAID=TnL5HPStwNw&ranSiteID=TnL5HPStwNw-C.coC1Z3iKAd2jPBU3NVKg&tduid=(201a613082386a51bef87b0d91ea32cb)(256380)(2459594)(TnL5HPStwNw-C.coC1Z3iKAd2jPBU3NVKg)()
- Install Sitecore Installation Framework
- Launch PowerShell as an administrator
- Enter and run following:
# Add the Sitecore MyGet repository to PowerShell Register-PSRepository -Name SitecoreGallery -SourceLocation https://sitecore.myget.org/F/sc-powershell/api/v2 # Install the Sitecore Install Framwork module Install-Module SitecoreInstallFramework # Install the Sitecore Fundamentals module (provides additional functionality for local installations like creating self-signed certificates) Install-Module SitecoreFundamentals # Import the modules into your current PowerShell context (if necessary) Import-Module SitecoreFundamentals Import-Module SitecoreInstallFramework - Confirm Untrusted repositories and select [A] Yes to All

- Validate the installation by typing the following. If everything is good you are good to go to the next step.
You should see something like thisGet-Module SitecoreInstallFramework –ListAvailable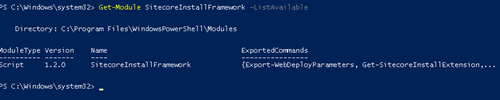
- Create certificate for xConnect
(In production new certificate will have to be purchased and setup but for development and testing we can generate a new certificate locally)- Edit xconnect-createcert.ps1 script and make sure you update variables for your environment. $prefix has to be the same as the one used when creating Solr cores on Solr server.
- Launch PowerShell as an administrator and execute following script to generate a new certificate for xConnect
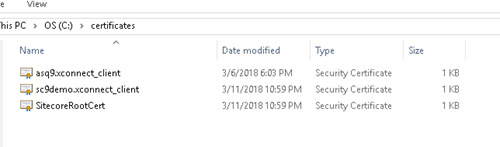
.\xconnect-createcert.ps1 - Certificates are generated in c:\certificates folder by default. Make sure your certificate is present.
- Edit xconnect-createcert.ps1 script and make sure you update variables for your environment. $prefix has to be the same as the one used when creating Solr cores on Solr server.
- Install Sitecore and xConnect
- Edit install-custom.ps1 script and make sure you update variables for your environment. $prefix has to match other 2 scripts
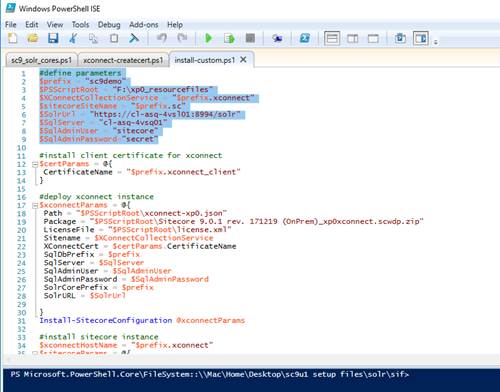
- We are now ready to install Sitecore 9. To start Sitecore 9 installation execute following script
.\install-custom.ps1 - After installation is completed successfully, go to the following url to verify Sitecore is installed.
http://$prefix.sc/sitecore (replace $prefix with whatever you used)
- Edit install-custom.ps1 script and make sure you update variables for your environment. $prefix has to match other 2 scripts
- Confirm xConnect certificate
- To ensure proper configuration has been established you should confirm certificate thumbprint for xConnect in the connectionStrings.config. Thumbprint value in connectionStrings.config should be UPPERCASE as shown in the screenshots below.
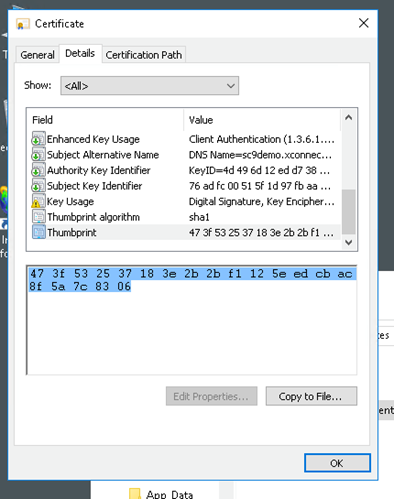
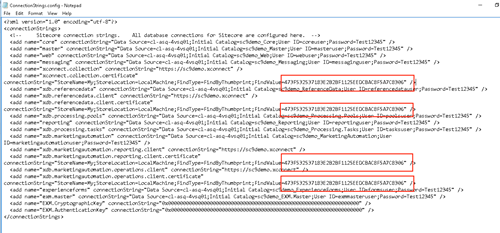
- To ensure proper configuration has been established you should confirm certificate thumbprint for xConnect in the connectionStrings.config. Thumbprint value in connectionStrings.config should be UPPERCASE as shown in the screenshots below.
Scripts
All scripts used in this series are available in the GitHub repository. You will have to download Sitecore 9 packages from Sitecore Experience Platform 9.0 Update-1 page.
Possible Issues and Fixes
This is the list of possible issues during and after the Sitecore 9 installation and info on how to resolve them.
- HTTP error 403.16 - client certificate trust issue
- Sitecore has no necessary permissions for reading/creating counters
- PhantomJS errors in logs slowing installation of Sitecore packages (Disable GenerateScreenshots)
- Potential issue with passwords and strings in PowerShell
- Script Error -> "Error Code: ERROR_SCRIPTDOM_NEEDED_FOR_SQL_PROVIDER"
- 'sqlcmd' is not recognized error (this should have been downloaded in steps 1g and 1h)
Summary
This blog concludes Sitecore 9 - Multi Server Installation series.
